iPad Setup Guide
Tips for running peeq on a dedicated iPad or tablet display
Getting Started
An old iPad makes an excellent dedicated peeq display. We've run an iPad Mini 4th Generation (2015) continuously for over a year with no issues — that's a 10+ year old device, older than one of our kids! If your iPad runs Safari, it'll run peeq.
You don't need to wall-mount it right away (or ever). Stand it on a small easel or tablet stand. Prop it up in a case. There are plenty of options that don't require putting anything on the wall.
A common concern with always-on displays! We've had no burn-in issues even after a year of continuous use. The key is dimming the screen overnight, which also reduces power consumption and prolongs screen life. See the Screen Dimming section below.
Using a "Scratch" iPad
For a dedicated display, consider setting up the iPad without an Apple ID. This approach has several benefits:
- No sync concerns — Photos, messages, and other apps won't sync or use storage
- Maximum storage — No iCloud content eating up space on older devices with limited storage
- Simplified setup — Fewer accounts mean fewer things that can break or need updates
- Privacy — If the iPad is in a public area, your personal data isn't on it
How to Set Up Without an Apple ID
- Factory reset the iPad (Settings → General → Transfer or Reset iPad → Erase All Content and Settings)
- During setup, when prompted to sign in with Apple ID, look for and tap "Don't have an Apple ID or forgot it?" then "Set Up Later"
- Complete the rest of the setup process
- Open Safari and navigate to your peeq dashboard URL
- Add to Home Screen for app-like experience (Share → Add to Home Screen)
Keeping the Screen On
By default, iPads turn off the screen after a period of inactivity. For a dashboard display, you want it to stay on.
Option 1: Guided Access (Accessibility Mode)
The simplest approach. Guided Access locks the iPad into a single app and keeps the screen on.
- Go to Settings → Accessibility → Guided Access
- Turn on Guided Access
- Set a passcode (you'll need this to exit Guided Access)
- Open Safari with your peeq dashboard
- Triple-click the Home button (or Side button on newer iPads) to start Guided Access
- Tap Options and turn off Sleep/Wake Button
- Tap Start
The iPad will now stay on this page. Triple-click and enter your passcode to exit.
Option 2: Auto-Lock Settings
A simpler but less locked-down approach. Go to Settings → Display & Brightness → Auto-Lock and set it to Never.
Screen Dimming Automations
To prevent burn-in, save energy, and prolong screen life, set up automations to dim the screen overnight. This works on any iPad with the Shortcuts app (iOS 13+).
Create a Dimming Automation
- Open the Shortcuts app and go to the Automation tab
- Tap + in the top right, then Create Personal Automation
- Select Time of Day
- Set your evening dim time (e.g., 8:00 PM) and select Daily
- Tap Next, then add an action: search for "Set Brightness"
- Set brightness to 0% or 1%
- Important: Before saving, set the automation to "Run Immediately" (not "Run After Confirmation"). This ensures it runs automatically without requiring you to tap a notification.
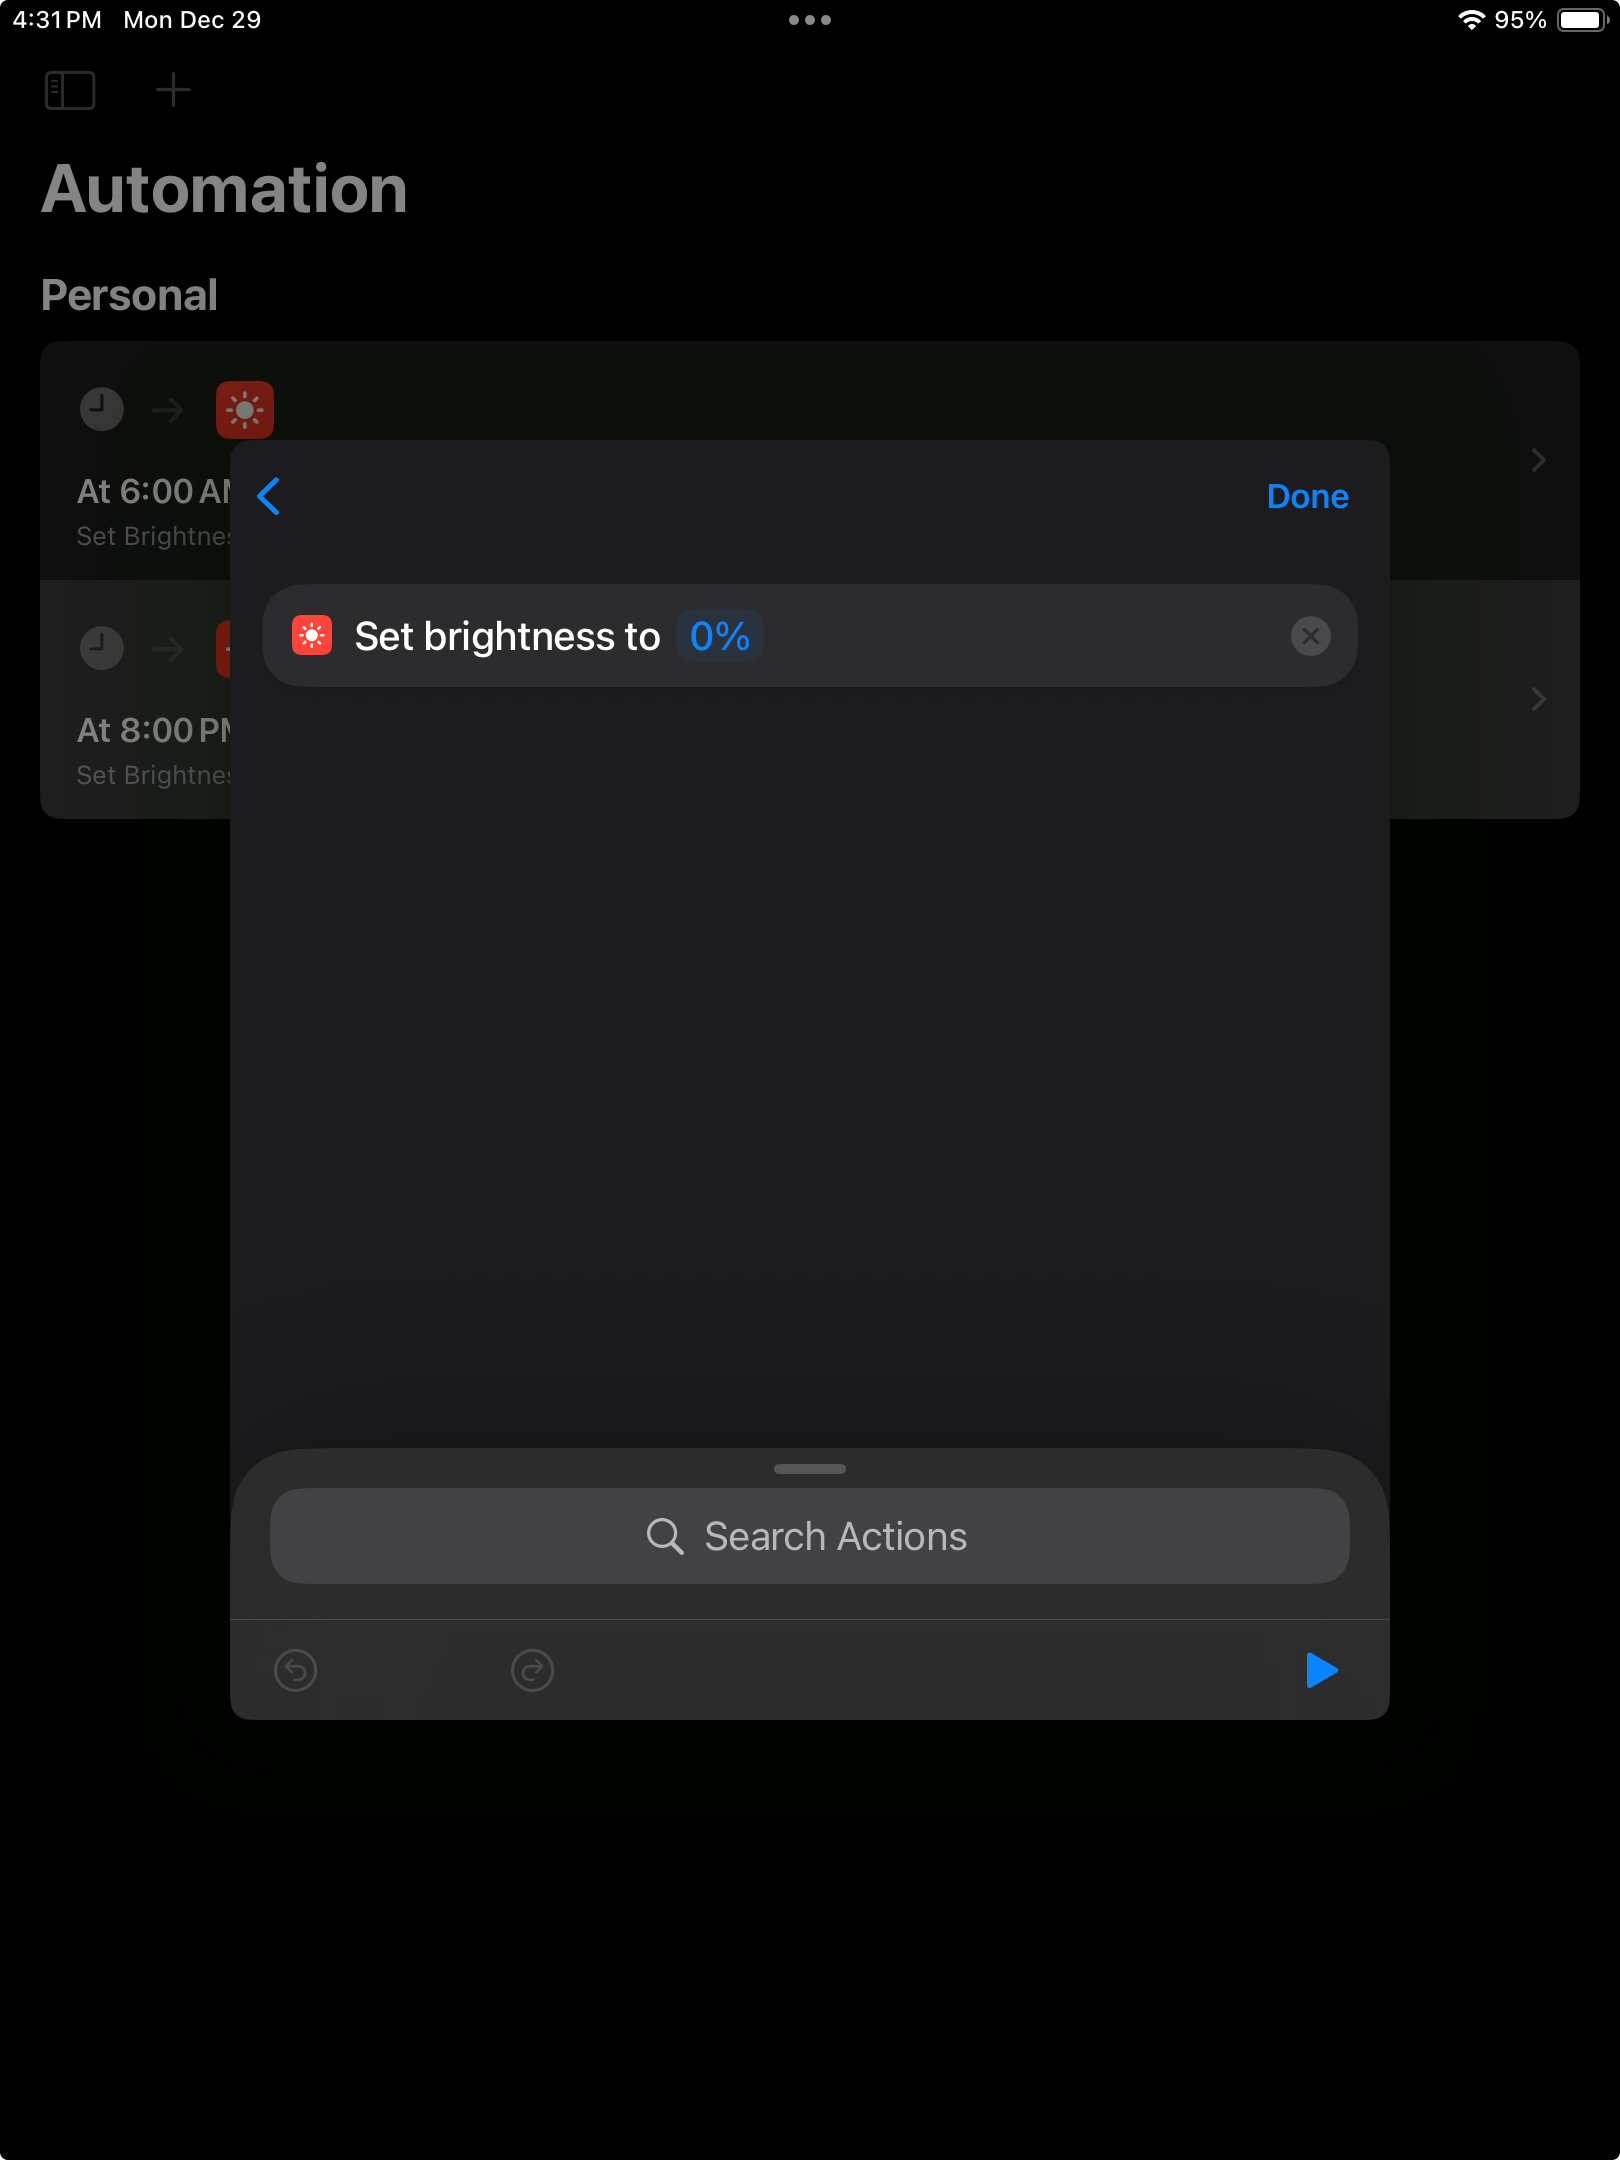
Adding the "Set Brightness" action and setting it to 0%
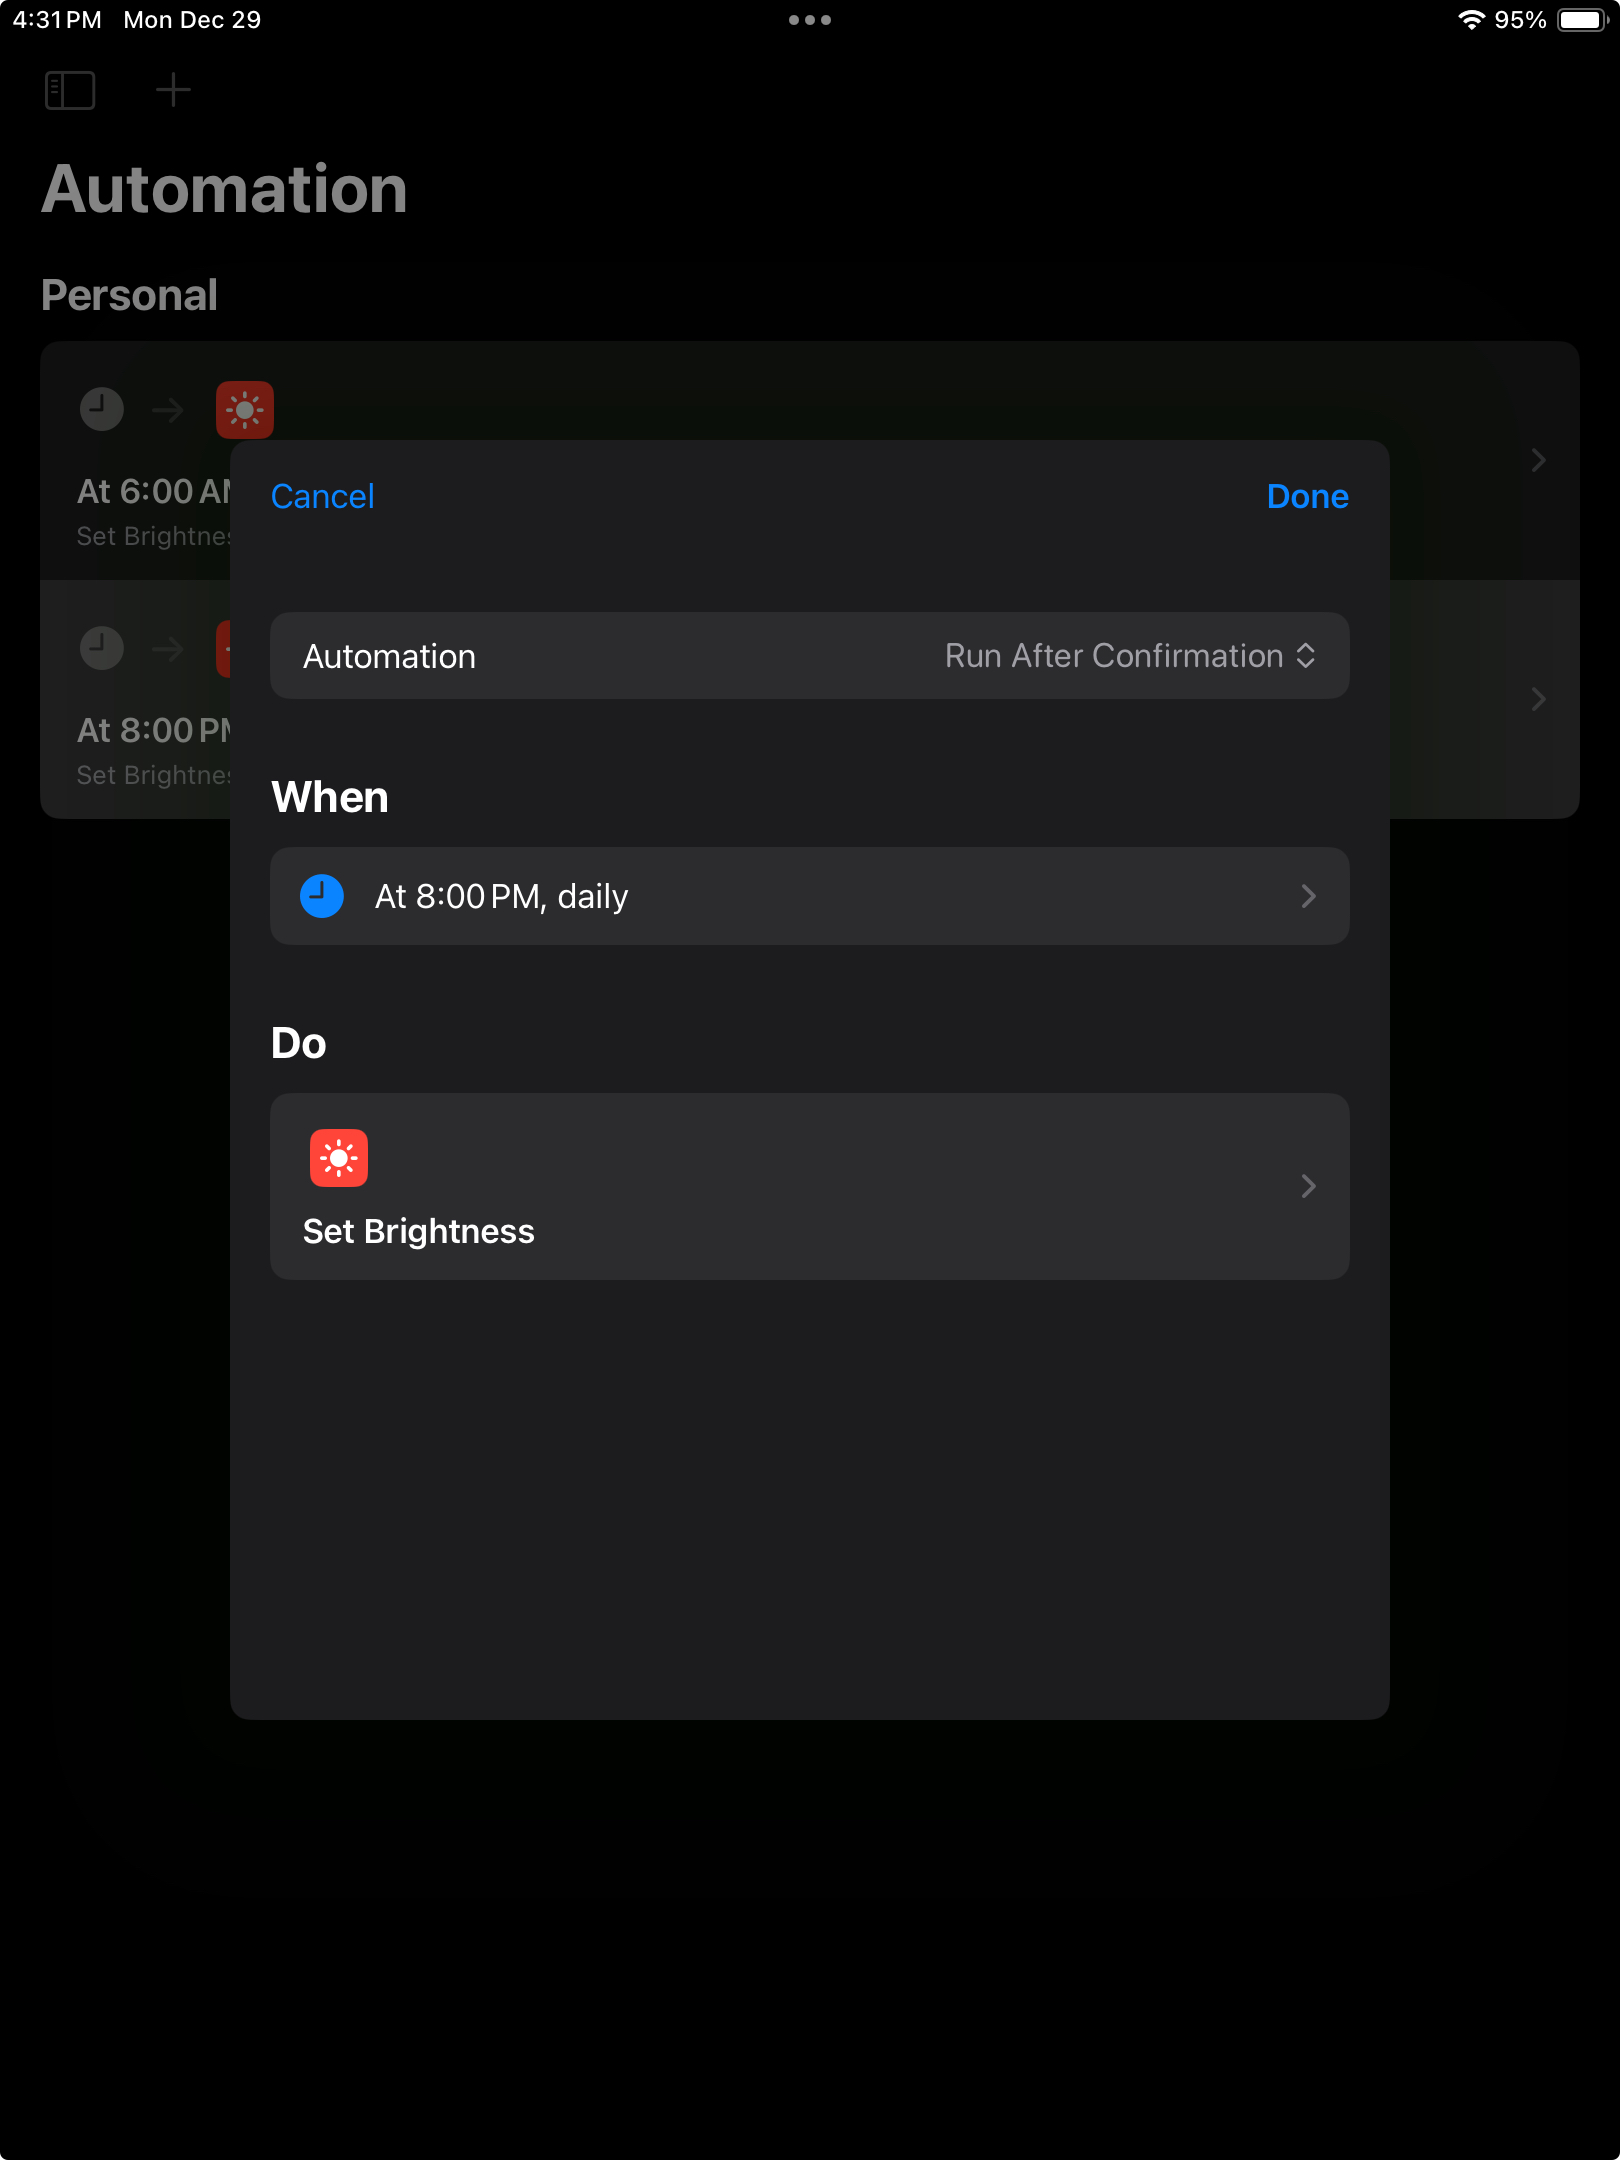
The default "Run After Confirmation" setting — this is NOT what you want

Change to "Run Immediately" so the automation runs without requiring a tap
Create a Morning Brightening Automation
Create a second automation for morning (e.g., 6:00 AM) that sets brightness back to 50%. Follow the same steps, just with a different time and brightness level. Again, make sure to set it to "Run Immediately".
Dimming overnight reduces power consumption and extends the life of your iPad's display. Combined with a quality charger, your iPad can run 24/7 for years.
Motion Sensor Wake
For a more sophisticated setup, you can use a HomeKit motion sensor to wake the iPad when someone enters the room. The screen stays dim until motion is detected, then automatically brightens.
This feature requires a newer version of the Home app with automation support. Older iPads (like the iPad Mini 4th Gen running iOS 15) may not have the required Home app features. The screen dimming automations above will still work on older devices.
Apple ID Required: You'll need to be signed in with an Apple ID on the iPad to use the Home app and create automations. This feature won't work on a "scratch" iPad set up without an Apple ID.
You'll also need a HomeKit-compatible motion sensor and an Apple Home Hub (Apple TV, HomePod, or a newer iPad). The display iPad can be the Home Hub if it's running iOS 16+.
Basic Setup
- Set up your motion sensor in the Home app
- Open the Home app and go to Automation
- Create new automation: When motion is detected
- Add actions to increase brightness and/or run a Shortcut
For a detailed walkthrough, see this helpful guide: Activate iPad via Motion Sensor
Mounting & Display Options
A few ways to display your iPad:
- Easels & tablet stands — The easiest option. No drilling, no commitment. Great for trying peeq out.
- Propped in a case — Many iPad cases fold into stands. Use what you have.
- Wall mounts — Many affordable options on Amazon. Look for ones with cable routing.
- Magnetic mounts — Easy to remove when needed
- 3D printed mounts — If you have access to a printer, there are many designs available
Route the charging cable neatly. For wall mounts, look for cables with 90° or even 180° angled plugs (available in both Lightning and USB-C) — they sit flush against the iPad and help hide the cable. Some wall mounts include built-in cable routing.
Additional Resources
Here's a helpful video walking through an iPad dashboard setup: